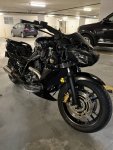
chain tensioner issue

Freddy

Active member
Getting the plastic off is something of a challenge the first time. Follow the steps in the FSM (factory service manual) - though where it says 'remove' it doesn't say how to remove. The instructions were obviously written by someone who was very familiar with it.

Where in the world are you Mika?

Edit: I now see Vancouver. My wife & I were there 6 years ago. We did the Rocky Mountaineer circuit via Lake Louise - absolutely loved it!


You probly read that the rear one in mine was the problem but I pulled the front one out to check - and it was not worn, very surprisingly.
 
Last edited:

Mika

New member
Hey Freddy, long time no texting. :) Since October I got pretty familiar with the service manual, had an HFT issue, and was able to fix it and now I feel ready to pull the trigger and attempt to change the CCT myself. And I want to do that as Honda has quoted me 2500$ for that fix, which is absolutely crazy.

I am pretty sure that mine too is with the rear tensioner (listening with a screwdriver to my ear, made things very clear), and as you said it doesn't say how exactly to remove the tensioner. I have spent many hours looking for a video on youtube and nothing. So I have a few questions.

Do I understand the cadence correctly? I have to remove the central cove, upper fuel tank, valve cover, and 2 bolts holding the tensioner, and after I'll be ready to take it out. Also before that, I'll have to find the TDC which seems to be easy.

1. Will I need to remove the cam chain sprocket or the valve train?
2. How do I know it is the compression stroke? It says in the manual that find TDC on comp. stroke.
3. Do I need a brand new valve cover gasket, or just applying some Honda bond to put it together with the old one is enough?
4. When removing the tensioner: do I have to push one of the wedges down and pull up the other and fix it with a 2mm pin to be able to pull it out?
5. Am I missing something crucial?

Sorry for so many questions and thanks for your help.

P.S. I have not ridden the bike anywhere far, this is my first bike and I am only one year in Vancouver, moved here from Prague, CZ. But once I fix this issue will give it a try. :)


Getting the plastic off is something of a challenge the first time. Follow the steps in the FSM (factory service manual) - though where it says 'remove' it doesn't say how to remove. The instructions were obviously written by someone who was very familiar with it.

Where in the world are you Mika?

Edit: I now see Vancouver. My wife & I were there 6 years ago. We did the Rocky Mountaineer circuit via Lake Louise - absolutely loved it!


You probly read that the rear one in mine was the problem but I pulled the front one out to check - and it was not worn, very surprisingly.
 

Freddy

Active member
1. Will I need to remove the cam chain sprocket or the valve train? Sprocket, maybe - I don't remember but if you do, ensure you use Loctite on the bolts when you refit them and put a rag down there so they don't disappear. Valve train - no.

2. How do I know it is the compression stroke? It says in the manual that find TDC on comp. stroke. When both valves are closed ie, rocker levers both have clearance.

3. Do I need a brand new valve cover gasket, or just applying some Honda bond to put it together with the old one is enough? I applied a smear of silicone sealant to the old one.

4. When removing the tensioner: do I have to push one of the wedges down and pull up the other and fix it with a 2mm pin to be able to pull it out? It came out easily as I recall but you need to set it as detailed in the manual for to refit it.

5. Am I missing something crucial? I don't think so, apart from ensuring you know which timing mark is for which cylinder, but valve clearance will show that.

I repaired mine with a dab of weld as you would've read. Used ones can work too but inspect before fitting. Other Honda 700 twin bikes like the Transalp XL700 and Deauville NT700 also take the same tensioner but the part number is different for some unknown reason.
 
Last edited:

Mika

New member
Thank you so much, Freddy. You gave me the confidence I needed. Because even after doing some maintenance (changing the cracked windshield, flushing the coolant fixing the stuck HFT issue) this seemed to be the ultimate challenge that I needed some motivation to get on with. I plan to make a video so that people like me, who are very new to DIY repairs, can have something to refer to.


IMG_1995.jpg
This is how it looked like when I tared down, lots of learning on how to take the plastics off and back on again. And having to do it in underground parking with limited tools doesn't help either.

Will make a post here in a couple of weeks when I am hopefully done.

Thanks again!

1. Will I need to remove the cam chain sprocket or the valve train? Sprocket, maybe - I don't remember but if you do, ensure you use Loctite on the bolts when you refit them and put a rag down there so they don't disappear. Valve train - no.

2. How do I know it is the compression stroke? It says in the manual that find TDC on comp. stroke. When both valves are closed ie, rocker levers both have clearance.

3. Do I need a brand new valve cover gasket, or just applying some Honda bond to put it together with the old one is enough? I applied a smear of silicone sealant to the old one.

4. When removing the tensioner: do I have to push one of the wedges down and pull up the other and fix it with a 2mm pin to be able to pull it out? It came out easily as I recall but you need to set it as detailed in the manual for to refit it.

5. Am I missing something crucial? I don't think so, apart from ensuring you know which timing mark is for which cylinder, but valve clearance will show that.

I repaired mine with a dab of weld as you would've read. Used ones can work too but inspect before fitting. Other Honda 700 twin bikes like the Transalp XL700 and Deauville NT700 also take the same tensioner but the part number is different for some unknown reason.


Freddy

Active member
Mika, ensure to flush/bleed the brakes with fresh / unopened DOT 4 fluid too. To be done every 2 years. ABS units hate moisture in the fluid. I speak from experience.
 

Mika

New member
Hey Freddy, thanks for the tip. Actually, I had it done this spring, but only the front brakes along with new brake pads. Also had the front forks rebuilt with a new OEM seal as it was leaking when I bought it last year. Got new tires too, but that was a challenge on its own. I end up having to use different tires for the front and rear as they don't make the sizes anymore. Got the Bridgestone Exedra Max Radial Front Tire & Dunlop RoadSmart III Rear Tire. The shop owner that was supped to mount the tires was so angry, partially because I didn't buy the tires from him. But he said it'll do mechanically. He also suggested that he would fit one size smaller of the same tires but that's a discussion for the future. So this bike has only 11k on the clock but as it was just thrown in the garage and not ridden, it needed a lot of maintenance. Right now I need to fix the tensioner and the last one will be to flush the rear brake fluid and change the pads, but it still has 60%ish, so not in too much of a hurry to do that.
BTW talking about brakes, even after flushing and putting on new pads the front brakes make a slapping sound sometimes, but not always. I tried cleaning with brake cleaning liquid and a toothbrush, twice, but it still happens, though rarely. I suppose I need to take them apart and clean the calipers properly.
 

Freddy

Active member
The rear tyre is 190/50-17 and used on very many makes & models of bikes. The front is the much less common 130/70-17 but Dunlop make them in RSII and RSlll style. I got one a few months ago. As for the 'slapping' front brake - I'd let it go and see what develops. 11,000km? not much. Enjoy!


Top